If you have more than one WORD document open at a time, you can switch between them by using the CTRL + F6 keys.
To view two documents on the screen at once, click VIEW and then choose VIEW SIDE BY SIDE. This allows you to easily compare two documents that may have some of the same information.
You can also view two or more documents on the screen at once by clicking VIEW and then choosing ARRANGE ALL.
Monday, November 11, 2013
Monday, November 4, 2013
Open Word Quickly
Press your Windows key (shown below) and the R key. This will open your RUN box. You will then type winword and press enter. Word will launch immediately.

Sunday, October 27, 2013
Removing Table Borders in Word 2010
Many time when you create tables, you do not want the borders to show. If you want to remove table borders, complete the following:

- Under TABLE TOOLS, click LAYOUT, SELECT, SELECT TABLE.
- Under TABLE TOOLS, click DESIGN, BORDERS, click NO BORDER to remove all your borders.
In some tables, you will want to leave some borders and remove others. You can also remove top, bottom, left, and right borders along with other options shown below. Once you remove all borders, you can also go to Step 2 to view your gridlines which allows you to see your invisible borders and makes it much easier to move in the table.

Monday, October 21, 2013
HIPAA Violations
According to Christine Meyers' article, Most Common HIPAA Violation? Small-Scale Snooping dated August 14, 2012:
"Small-scale snooping is actually far more common than large scale theft or dramatic losses of equipment containing PHI. In fact, in the 2011 Survey of Patient Privacy Breaches*, about 70% of the survey respondents reported that they had experienced a HIPAA breach of some level—with the majority of those violations occurring as a result of snooping activity. Insiders were responsible for the majority of breaches, with 35 percent snooping into medical records of fellow employees and 27 percent accessing records of friends and relatives. More than half of the respondents stated that they lacked the appropriate tools for monitoring inappropriate access to PHI."
Since OFA 205 is currently working on medical documents, I thought I would post the civil violations and enforcements from the AMA website. After reviewing these, you can see that your curiosity at work is not worth the consequences. Medical offices have employees log in each day. Based on your login, your employer can see how many records you access each day and who they were. If you have no business lurking in a patient's file, you will eventually be caught. You are given a great amount of responsibility with patient health information. Please don't abuse it.
| HIPAA Violation | Minimum Penalty | Maximum Penalty |
|---|---|---|
| Individual did not know (and by exercising reasonable diligence would not have known) that he/she violated HIPAA | $100 per violation, with an annual maximum of $25,000 for repeat violations (Note: maximum that can be imposed by State Attorneys General regardless of the type of violation) | $50,000 per violation, with an annual maximum of $1.5 million |
| HIPAA violation due to reasonable cause and not due to willful neglect | $1,000 per violation, with an annual maximum of $100,000 for repeat violations | $50,000 per violation, with an annual maximum of $1.5 million |
| HIPAA violation due to willful neglect but violation is corrected within the required time period | $10,000 per violation, with an annual maximum of $250,000 for repeat violations | $50,000 per violation, with an annual maximum of $1.5 million |
| HIPAA violation is due to willful neglect and is not corrected | $50,000 per violation, with an annual maximum of $1.5 million | $50,000 per violation, with an annual maximum of $1.5 million |
Tuesday, October 15, 2013
Selecting Text in Word
There are a few shortcuts you have in Word that make selecting text very easy. The ones I use most are:
To select a word, double-click the word.
To select a sentence, press CTRL and click anywhere in the sentence.
To select an entire paragraph, triple click anywhere in the paragraph.
To select your entire document, press CTRL + A.
Saturday, October 5, 2013
International Addresses
Unfortunately, there is not one international format for addressing correspondence. Each country differs in the layout, hierarchical alignment, and items to include. So, how will we know how to send three identical letters to three different countries? Anything I don't know (and if you know me well, that's quite a bit), I always go and ask using my search engine of choice (and if you have ever sat through one of my classes you know that my favorite is Google). There are several good sites that will help you with the layout, alignment, and items. Those sites are:
- http://www.addressdoctor.com/en/countries-data/address-formats.html
- http://bitboost.com/ref/international-address-formats.html#Formats
- https://www.usps.com/send/international-addressing-tips.htm
You may even be wondering why we are learning how to address letters with the popularity of electronic correspondence. For some situations, nothing can replace snail mail/formal correspondence.
- Formal correspondence (snail mail) will earn more respect and time from the addressee. How many times have you deleted an e-mail without looking at it just based on who the sender is where letters addressed to you (that aren't junk mail) usually are opened and at least skimmed because you believe that few people will spend the time and money to send an item through the mail unless there is an important reason.
- E-mail correspondence is referred to as informal correspondence. We tend to use abbreviations, texting slang, etc. when writing them. E-mail does not carry the same clout as formally written letters on paper.
Monday, September 30, 2013
Spell Check in Word
You have spell checking options to choose from when using Word. By default in Word 2010, the program is set to not spell check words that are in uppercase. That means when you type a word incorrectly and it is in all caps, Word will not flag it as incorrect. If you want Word to recognize uppercase words that may be spelled incorrectly, do the following:
- Click FILE.
- Click OPTIONS.
- Click PROOFING.
- Choose what you want Word to ignore or flag.
Monday, September 16, 2013
Aligning Dollar Signs in 68-70
Lesson 68-70 is a block style business letter with a table in the body. The table lists stationery types and the cost of each.
When you look at the numbers you will want the dollar signs aligned perfectly. Turn on your show/hide button to see your spacing, and perform these steps:
1. Right-align numbers using the right-align button or highlight your numbers and press CTRL+R.

Make sure you center the table horizontally and double space above and below the table in the letter.
When you look at the numbers you will want the dollar signs aligned perfectly. Turn on your show/hide button to see your spacing, and perform these steps:
1. Right-align numbers using the right-align button or highlight your numbers and press CTRL+R.
Make sure you center the table horizontally and double space above and below the table in the letter.
Monday, September 9, 2013
Page Numbering
When you type a multipage letter, you need to insert a page number on all pages AFTER the first one. To insert page numbering, click Insert-Page Number-Top of Page-Plain Number 3. (See below)

To have a page number not print on the first page, click Different First Page under Header and Footer Tools tab. (See Below)

To have a page number not print on the first page, click Different First Page under Header and Footer Tools tab. (See Below)
Tuesday, September 3, 2013
When you close a tab accidentally . . .
When you are surfing the Internet and accidentally close a tab, press CTRL + SHIFT + T to reopen the tab.
Thursday, March 7, 2013
Tabs in Tables
If you have a tab set in a table and press the TAB key, your cursor will move to your next cell, not your next tab stop. So, to use tabs in a table, press CTRL+TAB to move the cursor to your tab stop.
Friday, February 15, 2013
Balancing Uneven Columns in Word
Placing your Word file into columns is very easy in Word. Just click PAGE LAYOUT and choose COLUMNS. Once your file is placed in columns, who knows how those columns will align. If you want your columns to align at the top and the bottom of the page, you just need to know which break to insert. I want the last column (shown in the picture below) to equal out on the page.

To equal out the column into two columns, position your cursor at the end of the column on the last page, click PAGE LAYOUT-BREAKS-CONTINUOUS. Your column will now look like the photo below.


To equal out the column into two columns, position your cursor at the end of the column on the last page, click PAGE LAYOUT-BREAKS-CONTINUOUS. Your column will now look like the photo below.

Sunday, February 10, 2013
Creating a Logo in Publisher
1. Open a blank Publisher document.
2. I went to INSERT-WORDART and chose something I liked for the words in my logo, changing the line and fill colors. I then went to INSERT-CLIPART and chose a piece of clipart I liked. Now we will put these together.
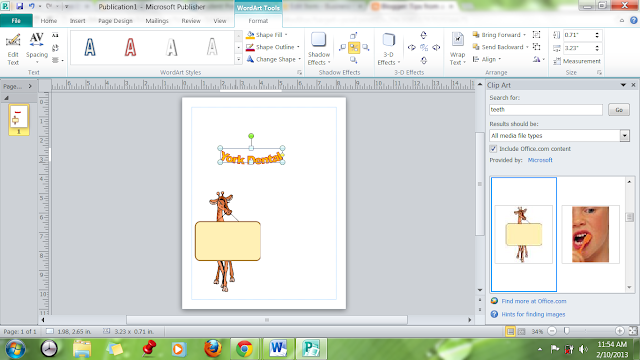
3. Drag your two items together so we can make the two work as one. Once you place one item on the other, you may have to play with your send backward, bring forward, as shown below on the right side of the screen, to make them work as you want (my York Dental was originally behind the giraffe and was not showing, so I clicked the giraffe and clicked the SEND BACKWARD button).

4. Now let's combine them as one by taking your mouse (hold down the left mouse key and drag the dotted marquee around the items) and surrounding the two items. It will resemble the photo below as you draw around it before you let off the left mouse key.

5. Once you let off the mouse, it will look like the photo below. Both items should now be selected. Notice how both have sizing handles shown indicating they are both active.

6. Right-mouse click on the two and click GROUP.

7. Now when you move your picture around, the two items will move as one. Right-click your new clipart and click SAVE AS PICTURE. Save as whatever you wish. Now you can insert your picture into a Word file, Publisher file, or use it in any way that you use it as any clip art file. Try inserting this file into a Word document by clicking INSERT-FILE once you open Word. If it works, you are ready to place the item in the dropbox.
Sunday, February 3, 2013
No PRTSC button on your keyboard?
Some of you may not have a PRTSC (print screen) button on your laptop, and you're asking why you really need one. Well, since our 205 class is now blogging for the semester, screen shots that demonstrate what you are writing about will be helpful (a picture is worth a thousand words). If you don't have a PRTSC button, screen shots may be difficult to capture. In Windows 7, you can use an on-screen keyboard (screen shot below). You may need to size it or move it around to capture the shot you want, but it's a simple way to obtain your screen shot. The steps are:

- Click your office button from your desktop (lower left screen for most of us)
- Type on-screen keyboard in the box that says SEARCH PROGRAMS AND FILES
- Click the on-screen keyboard when it appears in the list
- Once you have the screen shot you want (you may have to move the on-screen keyboard around or make it smaller to get the screen shot you want), press the PRT SCN button then go to Word or another program and paste (CTRL+V) it there. You can right-mouse click on the screen shot and choose SAVE AS PICTURE. You can then upload that picture into your blog.

Friday, January 25, 2013
PowerPoint Presentation Tips
My Top Tips for Creating a PowerPoint Presentation:
- 7 x 7 rule. That means no more than seven words per line with no more than seven lines per page. If you are presenting with your PowerPoint, every word you say shouldn't be on the slide.
- Do not type in complete sentences. Use keywords only.
- No flashy designs. It's distracting. Watch your colors. Pink words on a yellow background do not work! PowerPoint has preset colors and designs for a reason. There are also numerous designs online for free.
- Be consistent. Use the same font and sizes throughout.
- Watch your animations and sounds. If viewers have PTSD from the noise in your PowerPoint presentation, that is not a good thing! If you have things flying in from all directions, that distracts from you and the PowerPoint has replaced you. Not good!
- If you are presenting to a group, practice, practice, practice.
Subscribe to:
Posts (Atom)